EN

EN



Each problem is unique in its own way. Sometimes you get stuck with some bug without having an idea what to do next except to use joker “call other dev”. Sometimes you miss an estimate for the new feature by a lot just because you haven’t planned it properly or you have missed some obvious points because you haven’t asked the right questions at the right time.
As you gain experience, you probably start having your own way of approaching these problems, set of some unwritten. You formed these rules, by bleeding on some problems, basically from your mistakes and falls. Would it be better to gain advantage by developing/learning a strategy much earlier in a career, and avoid unnecessary bleeding.
Having an exact strategy on how to approach problems in development can make your life easier. Even though you don’t need to follow exact steps every time, you will by time incorporate these steps unconsciously in your routine. Start by forcing yourself to follow these steps, write them somewhere in a visible place in your (home)office. Let’s try to define strategy!
Even though your first tasks on your first real jobs will be to fix some minor bugs, soon after you will start working on some startup or get an opportunity to work on an important company project, there you will need to implement some features.
We have divided feature implementation in following steps:
- Analysis
- Estimation
- Coding
- Testing

Getting to know the feature you are developing is the most important thing, you need to know every corner of it and you need to know answers to all questions about it. Start by approaching the problem from a critical standpoint and label all those uncertainties you have and clear those things. Forget about all the technical details and just think of a functionality from a user perspective as if you are going to use it. Communicating properly with others in a team will be the only right way that will give results. So, communicating with a designer, PM , other devs, product and anyone else involved will save you a lot more time and meetings in a later phase.
This is the phase where most engineers spend less time than needed mostly because of:
- firm deadlines and they try to save time in analysis and estimation
- not willing to participate and communicate in meetings which are related to analysis
- because of mindset that these meetings are waste of time
- If you are less experienced engineer you might be having a fear of asking stuping questions
- jump on coding directly and try to figure out things during development
As a part of analysis you need to do following:
1. Read your ticket
Read your ticket carefully. Make sure all acceptance criterias are clear to you. If there are no AC’s, there must be some product or project manager who should explain the ticket to you.
After you have read your ticket, if you are working on client-side there should be some design that will show you what you need to code.
2. Design analysis
You need to analyze design, and communicate any potential discrepancies or unclarities with the designer.
- Check if designer is following design system and using standardized components
- Check if implementation complexity is on a much higher level then benefits we are getting?
3. Compare design and acceptance criteria (AC)
Compare ticket description (and AC’s) with implemented design. If they are not in sync, communicate those differences with products, PM and designer. You need to have a clear picture, and know everything about the feature you are going to implement.
4. Ask questions
- Don’t be afraid to ask questions about anything.
- Asking questions and proper communication is in general one of the most important things that will take you to successfully finalize your tasks on time.
5. Check the codebase and analyze technical implementation
After you are clear about what you need to implement, you should take a quick look at the current state of the app and check the codebase where you are adding this feature. Think from a logical standpoint, are there some things that are not possible to implement in a way that non-tech people have envisioned it. See if you have proper knowledge of the technology you are working on, try figuring out if you can implement requested or you need guidance from more senior dev.
Ask for opinions from people who have already touched that part of the app.
6. Client side - server side sync
Also, if you are interacting with the backend side (or vice-versa), you need to take into account if you have everything ready from the other side. Also, point out any additional work that should be done on the other side before you can complete your task.
7. Divide ticket into subtasks
After you have verified all the stuff mentioned, you need to create your own plan of the implementation. Divide ticket into minor subtasks, either creating those subtasks in reality or having it just on a piece of paper.
8. Create implementation plan
Write down your plan and keep notes of any future adjustments.
When approaching ticket estimation, the best case scenario is that you have done all the steps from analysis and you come prepared for the pointing session. Don’t be afraid to postpone estimations, or to reject estimating when things are not clear enough to you. Once you estimate the ticket, any broken deadline from the dev side is on you. Of course, some unexpected things will always happen, issues will occur, but you need to make sure that you did your best.
Why are most estimates inaccurate ?
- Not investing enough time in analysis phase - being unprepared
- Being too optimistic and not anticipating unexpected events
- Blind guessing
When estimating, you should keep in mind following things:
1. Estimate each subtask separately
Estimate each subtask separately and in the end just summarize the points.
2. Consider PR reviews
You should consider also adding some points for PR reviews - because those can take some time, especially when complex logic is implemented.
3. Meetings and communication in the team
Consider time you will need to invest into communication with the team if needed (ex integration)
4. Dev Testing
Dev testing is a really important part to minimize bugs produced, so that will take some time also. Also, if you are working in different environments, you need to test on all those also. If deploying is your responsibility, you should take into account that time also.
5. Unexpected things
And just when you thought you had your final estimate, pause for a second, and add some points for unexpected things. Always expect the unexpected.
Once the time has come for you to start coding your feature, just go over your plan and go task by task. Seek help on time once you are stuck, at least talk with someone or use the rubber duck method.
1. Split your code
It would be best to have one feature branch on which you will merge multiple minor subtasks - meaning split your code to get approvals faster. Dev test everything in detail.
2. Escalate the issues - push deadlines on time
If you encounter any issue, either something is much harder to implement or you notice something that you have missed, don’t be afraid to escalate the issue, to contact anyone involved in it. Be honest, don’t be optimistic in a way that the newly found issue won’t affect deadlines, sooner you accept it and push the deadline for a valid reason you will lower stress and pressure for everyone, most importantly for you.
3. Compare implementation with AC’s, design and description
When you finish coding and you are just about to create a PR, go over AC’s, ticket description and design and verify that your work is in sync with the requirements.
4. Self-review your code and seek improvements
Before creating a PR, you also need to do self-review of your code, and seek improvements. See if you can refactor something or do some other code improvements.
5. Think of edge cases and dev test everything once more
Dev test everything in detail - this will keep bugs away from you.
Try to find possible edge cases, be as destructive to your code as you can.
6. Create a PR
When creating a PR, add comments with explanations for problematic places where you feel that someone could add a comment. It is always better to comment first, to show that you are aware the code is not easy to understand.
7. Resolve comments, finalize discussions
To merge your code it is really important to resolve/reply to comments on your PR as soon as possible, so you don’t get conflicts and also to speed up merging PR. Don’t leave your PR in a vacuum for some time.
In the end, when your code is merged, test it on the environment once more to make sure that it really works.
Mistake that a lot of developers do is they skip environment specific testing and directly move ticket to QA and issues might arise:
- Code was not deployed because of build issues and QA returns ticket
- There are some environment specific bugs which you did not covered during dev testing
- Someone else changes uncovered one of the cases you haven’t handled properly
Handling bugs
While most of these rules and principles apply to bugs, there are some key differences in the approach that we will mention in this section.
Before we delve into the details on how to tackle bugs that have appeared in the feature development process, we should quickly mention the types of bugs that you might encounter.
Types of bugs
• Styling
◦ Description: Styling bugs refer to issues related to how elements are presented visually on the user interface.
◦ Examples: Incorrect colors, font sizes, margins, paddings, or issues with layout responsiveness.
• Logical mistakes
◦ Description: Logical mistakes are errors in the application's logic flow, where the program does not perform the intended actions due to flawed reasoning or oversight.
◦ Examples: Infinite loops, unreachable code, or unintended consequences of conditional statements
• Business logic
◦ Description: Business logic bugs are errors related to how the application handles specific rules and processes that are essential to the core functionality of the software.
◦ Examples: Incorrect calculations, flawed decision-making processes, or rules not applied correctly.
• Rendering
◦ Description: Rendering bugs occur when the content or elements on a webpage or application do not display correctly or as intended.
◦ Examples: Misaligned elements, overlapping content, or elements not appearing in the correct order.
• Cross browser compatibility
◦ Description: Cross browser compatibility bugs occur when a website or application behaves differently across various web browsers or versions.
◦ Examples: Features not working in certain browsers, layout issues specific to a browser's rendering engine, or performance variations.
• Data issues
◦ Description: Data issues involve problems with the integrity, accuracy, or consistency of data within the application.
◦ Examples: Incorrect data retrieval, data corruption, or mismatches between different data sources.
• State management
◦ Description: State management bugs involve problems with how data is stored and managed within an application, especially across different parts of the application.
◦ Examples: Inconsistent data updates, incorrect data being displayed, or data loss under certain conditions
These aforementioned bug types are most common bug types that you will encounter, some other notable mentions are:
• Compatibility issues
◦ Description: Compatibility bugs arise when the software does not work correctly with other software components or systems it needs to interact with.
◦ Examples: API changes not accounted for, incompatible library versions.
• Performance bugs
◦ Description: Performance bugs impact the speed or responsiveness of the software.
◦ Examples: Slow loading times, high memory usage, or inefficient algorithms causing delays.
• Security bugs
◦ Description: Security bugs involve vulnerabilities that could be exploited by malicious users or code.
◦ Examples: Incorrect authentication setup, missing authentication middleware.
• Localization issues
◦ Description: Localization bugs occur when the software does not behave correctly or display content properly in different languages or locales.
◦ Examples: Text truncation, incorrect date/time formatting, or issues with character encoding.
• Deployment bugs
◦ Description: Installation or deployment bugs prevent the software from being installed or deployed correctly.
◦ Examples: Configuration errors, incorrect environment variables
While all of these bug types could be a separate topic itself, we were thinking of a general way to handle all of these variations. It is not mandatory to take all these steps when fixing your bug, but it is a good idea to take all them into consideration when doing your development to minimize unexpected issues that might occur from your fix.
We have split this method into 4 parts: ticket analysis, problem analysis, coding, testing
Ticket analysis
1. Read the ticket carefully
a. Make sure you fully understand the problem at hand
b. Read the documentation related to the bug at hand to make sure you didn’t miss any hidden requirements or acceptance criteria
c. Ask questions to people who are reporters of the issue as well as your PM or team lead
d. Make sure everything is clarified2. Reproduce the bug
a. Sometimes a bug that is reported is not even a bug, a lot of the times the reporter of the issue did not go through previous point before the issue is raised
b. Make sure you understand under what circumstances this error is reproduced
c. If there are some more issues related than what is being reported, notify the PM/QA about it
3. Analyze
a. Confirm whether the issues is caused by client side or server side changes
b. Confirm whether the issues might be caused by another team
c. With proper analysis, there might be no need for development, problems are often solved by communication with the team
d. Make sure you document your analysis (post your findings in the comments of the ticket or similar)
e. Assume the feature is a black box and write all the IN-OUT cases for the feature and highlight those for which the problem presents itself
Problem analysis
1. Search where the issue happens on a higher level
a. Try to locate the screen/component where you think the problem resides
b. What is happening and how should it behave differently ?
c. When did the issue start to appear ? Get some insights from the Git Lens extension.
2. Debug the code to find the exact location of the culprit
a. In some cases, try not to look at the part where you think the bug is happening, sometimes you have to go a few steps back or a few steps further to locate the actual cause of the issue.
b. Read the lines of code line by line, understand what is happening under the hood
3. Think of the IN-OUT parameters that you wrote in the previous section, check if the line that you suspect produces unexpected results for the highlighted cases
Coding
1. By the time you come down to this part, you most likely know what change to make to fix the bug at hand
2. Visualize the problem, go over the exact steps that you have tried and didn’t work (Rubber duck)
3. If you don’t know how to do it (even after the analysis step), ask for help from a more senior developer
4. If you have a sense that you could write this code cleaner/better write it down
a. Always do some minor refactoring if you have the time to do so.
Testing
1. Developer testing
a. By doing proper developer testing, you will save valuable development/testing time further and lower the chances of encountering a “boomerang” effect with your bug ticket. Just think of the path the ticket has to go before it comes back to you.
b. Use the IN-OUT cases that you wrote in one of the previous steps to check if all works as expected
c. This includes testing your fix after your changes were deployed to the staging environment
One thing to note from all of this is that even the most senior don’t go through all of these exact steps, the point of this guide was that all of these points make a strategic way to tackle issues and to make sure they have tried with everything that is in their power. Usually, when this method doesn’t help, the developer mostly relies on the help of someone who had previous experience with a similar issue, someone more experienced or perhaps trying to fish for an answer on Stackoverflow which should always be the last resort.
Each problem is unique in its own way. Sometimes you get stuck with some bug without having an idea what to do next except to use joker “call other dev”. Sometimes you miss an estimate for the new feature by a lot just because you haven’t planned it properly or you have missed some obvious points because you haven’t asked the right questions at the right time.
As you gain experience, you probably start having your own way of approaching these problems, set of some unwritten. You formed these rules, by bleeding on some problems, basically from your mistakes and falls. Would it be better to gain advantage by developing/learning a strategy much earlier in a career, and avoid unnecessary bleeding.
Having an exact strategy on how to approach problems in development can make your life easier. Even though you don’t need to follow exact steps every time, you will by time incorporate these steps unconsciously in your routine. Start by forcing yourself to follow these steps, write them somewhere in a visible place in your (home)office. Let’s try to define strategy!
Even though your first tasks on your first real jobs will be to fix some minor bugs, soon after you will start working on some startup or get an opportunity to work on an important company project, there you will need to implement some features.
We have divided feature implementation in following steps:
Block quote
Unordered list
Bold text
Emphasis
Superscript
Subscript
Each problem is unique in its own way. Sometimes you get stuck with some bug without having an idea what to do next except to use joker “call other dev”. Sometimes you miss an estimate for the new feature by a lot just because you haven’t planned it properly or you have missed some obvious points because you haven’t asked the right questions at the right time.
As you gain experience, you probably start having your own way of approaching these problems, set of some unwritten. You formed these rules, by bleeding on some problems, basically from your mistakes and falls. Would it be better to gain advantage by developing/learning a strategy much earlier in a career, and avoid unnecessary bleeding.
Having an exact strategy on how to approach problems in development can make your life easier. Even though you don’t need to follow exact steps every time, you will by time incorporate these steps unconsciously in your routine. Start by forcing yourself to follow these steps, write them somewhere in a visible place in your (home)office. Let’s try to define strategy!
Even though your first tasks on your first real jobs will be to fix some minor bugs, soon after you will start working on some startup or get an opportunity to work on an important company project, there you will need to implement some features.
We have divided feature implementation in following steps:
Block quote
Unordered list
Bold text
Emphasis
Superscript
Subscript
Each problem is unique in its own way. Sometimes you get stuck with some bug without having an idea what to do next except to use joker “call other dev”. Sometimes you miss an estimate for the new feature by a lot just because you haven’t planned it properly or you have missed some obvious points because you haven’t asked the right questions at the right time.
As you gain experience, you probably start having your own way of approaching these problems, set of some unwritten. You formed these rules, by bleeding on some problems, basically from your mistakes and falls. Would it be better to gain advantage by developing/learning a strategy much earlier in a career, and avoid unnecessary bleeding.
Having an exact strategy on how to approach problems in development can make your life easier. Even though you don’t need to follow exact steps every time, you will by time incorporate these steps unconsciously in your routine. Start by forcing yourself to follow these steps, write them somewhere in a visible place in your (home)office. Let’s try to define strategy!
Even though your first tasks on your first real jobs will be to fix some minor bugs, soon after you will start working on some startup or get an opportunity to work on an important company project, there you will need to implement some features.
We have divided feature implementation in following steps:
Block quote
Unordered list
Bold text
Emphasis
Superscript
Subscript
Each problem is unique in its own way. Sometimes you get stuck with some bug without having an idea what to do next except to use joker “call other dev”. Sometimes you miss an estimate for the new feature by a lot just because you haven’t planned it properly or you have missed some obvious points because you haven’t asked the right questions at the right time.
As you gain experience, you probably start having your own way of approaching these problems, set of some unwritten. You formed these rules, by bleeding on some problems, basically from your mistakes and falls. Would it be better to gain advantage by developing/learning a strategy much earlier in a career, and avoid unnecessary bleeding.
Having an exact strategy on how to approach problems in development can make your life easier. Even though you don’t need to follow exact steps every time, you will by time incorporate these steps unconsciously in your routine. Start by forcing yourself to follow these steps, write them somewhere in a visible place in your (home)office. Let’s try to define strategy!
Even though your first tasks on your first real jobs will be to fix some minor bugs, soon after you will start working on some startup or get an opportunity to work on an important company project, there you will need to implement some features.
We have divided feature implementation in following steps:
Block quote
Unordered list
Bold text
Emphasis
Superscript
Subscript
Lorem ipsum dolor sit amet, consectetur adipiscing elit, sed do eiusmod tempor incididunt ut labore et dolore magna aliqua. Ut enim ad minim veniam, quis nostrud exercitation ullamco laboris nisi ut aliquip ex ea commodo consequat. Duis aute irure dolor in reprehenderit in voluptate velit esse cillum dolore eu fugiat nulla pariatur.
Block quote
Ordered list
Unordered list
Bold text
Emphasis
Superscript
Subscript
Adding advertising to a website can look like a small frontend task. Load a script, add an empty container, and wait for an ad to appear. In a production application, however, the real implementation is spread across several systems. Google Ad Manager controls inventory and delivery, Google Publisher Tag communicates with the browser, and the application controls where and when each placement is rendered.
The challenge is not simply making one ad appear. The goal is to build an integration that continues to work across responsive layouts, client-side navigation, dynamic feeds, native creatives, and future campaign changes.
This article presents the main ideas behind a Google Ad Manager implementation in a React and Next.js application. It focuses on the decisions that proved most useful, the issues that were easy to misdiagnose, and a practical method for maintaining the integration.
Google Ad Manager uses several objects that work together. Understanding the responsibility of each object makes the rest of the integration much easier.
An ad unit represents a piece of inventory. It describes a real location in the application, such as a homepage rail, an article body, or a position inside a feed where a Google Ad will later be rendered. An ad unit should usually be reused when the page location remains the same. A different image or campaign does not automatically require new inventory, but rather that the content of the ad unit changes
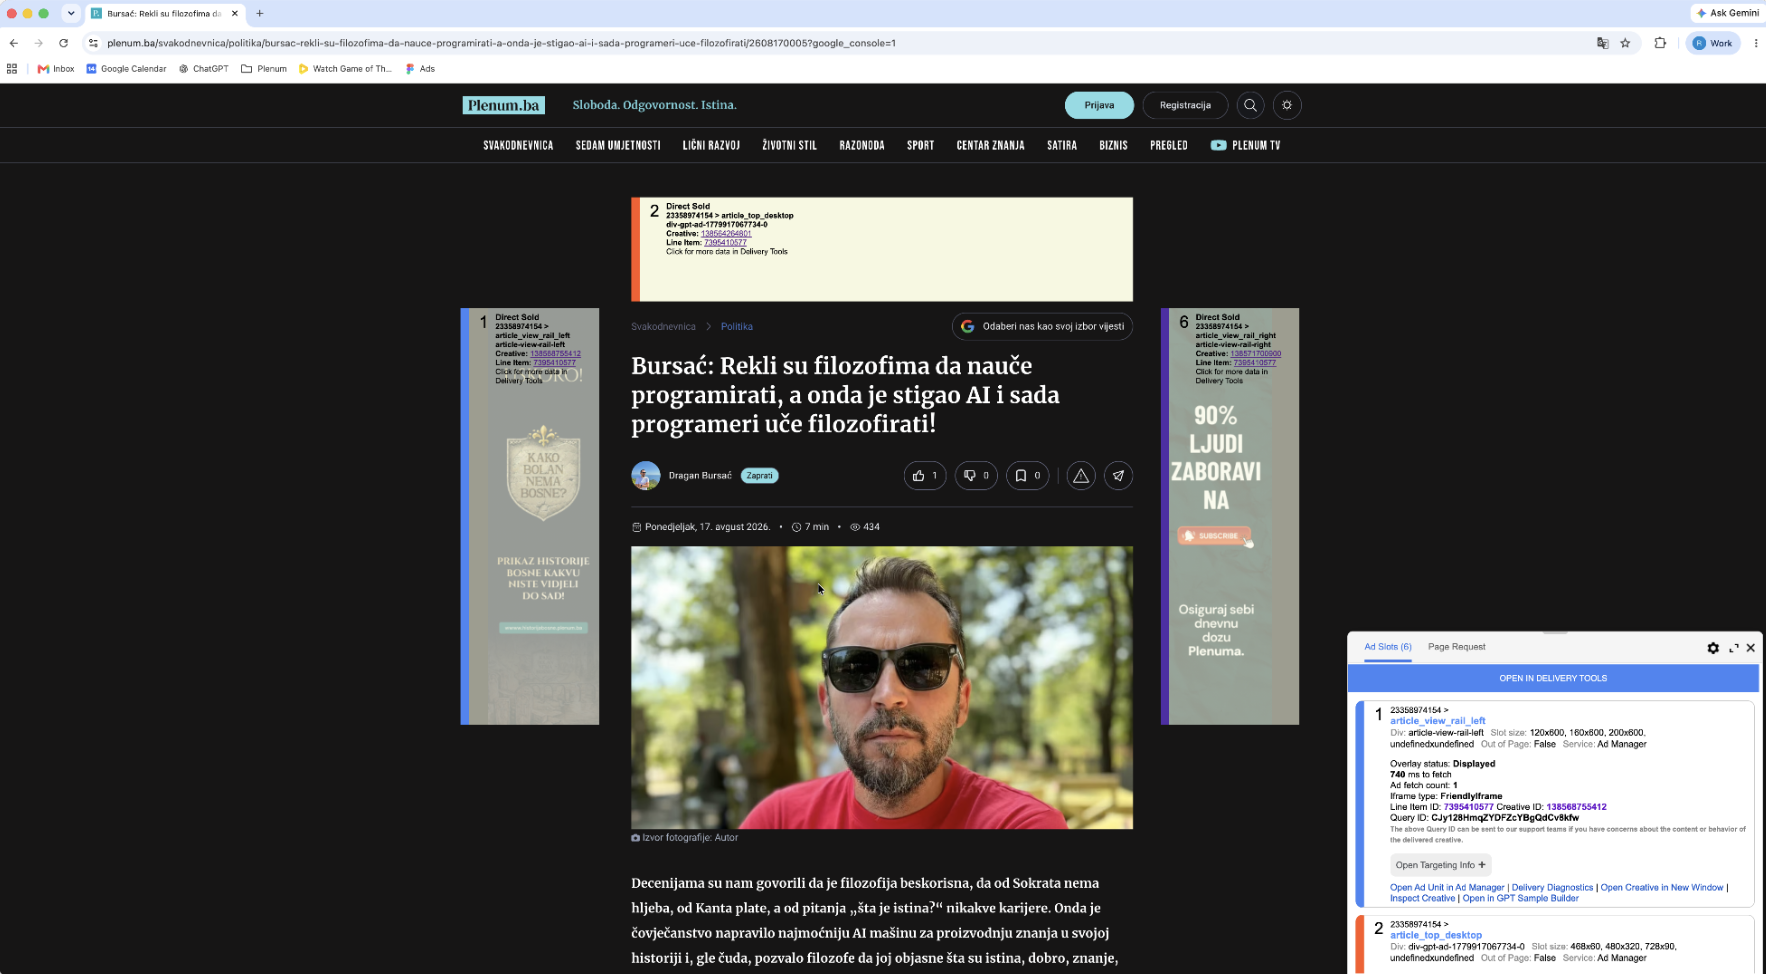
Note: The ad units are displayed because we added the “?google_console=1” param to the URL. Now we can see exactly which creative is displayed in which slot and what line item is causing the creative to be displayed in that ad unit.
A line item contains the delivery logic. It decides which ad unit can receive an ad, which creative types are expected, and which targeting rules must be satisfied. A creative can be configured correctly and still never appear if its line item does not target the intended ad unit. An expected creative describes what the line item is prepared to serve. This may be a fixed size, a fluid native format, or another supported creative type. Size and format mismatches are a common reason for an apparently valid creative product producing no result.
A creative is the final advertisement. It contains the image, destination URL, text, or other values that will be delivered in the ad unit. Many everyday maintenance tasks only require a creative change. They do not require changes to the ad unit, native style, or frontend. For native advertising, two more concepts are important:
This distinction is useful in practice. If a new field is required, the format changes. If the same fields need a different layout, the style changes. If only the image or URL changes, usually only the creative changes.
Line Item Targeting is when we define what ad unit the line item is allowed to serve. For example, we can set up that the Line Item server the ad unit "Article Mobile Top", meaning it will serve the ad for the ad slot positioned on the top of the screen on mobile screens
Creative Level Targeting is useful if we have a line item serving two ad units, both of
dimensions 250x250, and two creatives inside that line item, both of dimensions 250x250 again, GAM will not know which creative goes on which ad slot, and therefore it will randomly display the ads each time we refresh the page.
In order to combat this, we use Creative Level Targeting, where we specify that a certain creative should go to a certain slot.
.png)


